Save 30% off Any Shed Plan Purchase!
Signup For My 'Shed n Sight' Newsletter
and Get Your 30% off Promo Code To Use At Checkout.
- Home
- Shed Roof Framing
- Gambrel/Barn Shed Roof
How To Build A Gambrel or Barn Style Shed Roof
Gambrel and barn are synonymous - they both mean the same thing! [ I don't want you to be confused before we begin!]
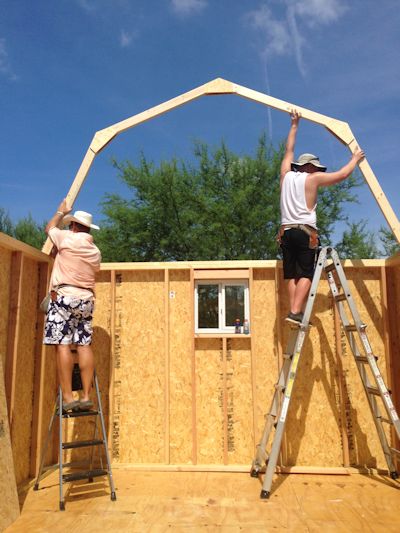 How To Build a Gambrel Shed Roof
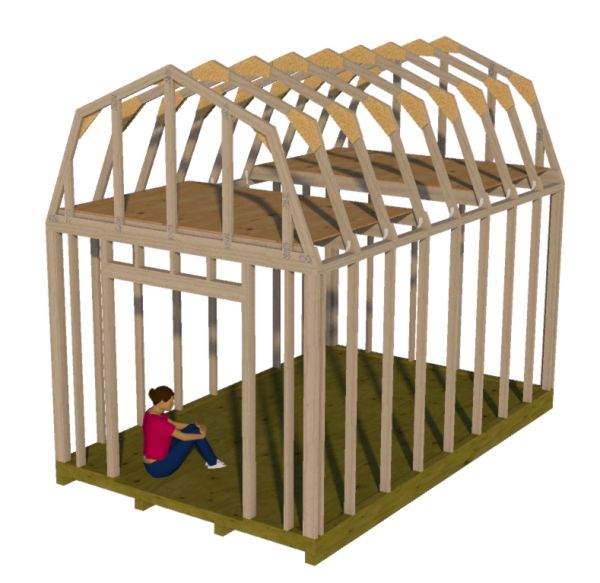 Gambrel Style Shed Roof
The following information is a guideline you can use for building a gambrel shed roof.
Use this information at your own risk. As always seek the advice of your local building officials if you plan on using this information to build your shed roof to make sure your shed will be built to local building code specifications.
How wide do you want your gambrel shed to be?
Please do not use these guidelines for building a shed wider than 12'. The example I use below is for a 10' wide barn. For safety reasons, you should have a truss manufacturer build your gambrel trusses for sheds wider than 12'
Barn style sheds offer more storage in the attic!
A gambrel style shed roof offers the
most storage space in the attic when compared to a gable or saltbox
style shed roof. The guidelines I am about to explain for you outline
the steps I use when I am designing my gambrel shed plans, barn shed
plans, and small barn plans.
The example I will use for showing you how to build your own gambrel shed trusses will be a 10 foot wide shed. The top and side truss members will be equal in both length and end angle measurements. Each truss will consist of 10 pieces. 4 truss members, and 6 gusset plates.
Interested in shed truss plans? Check out my collection.
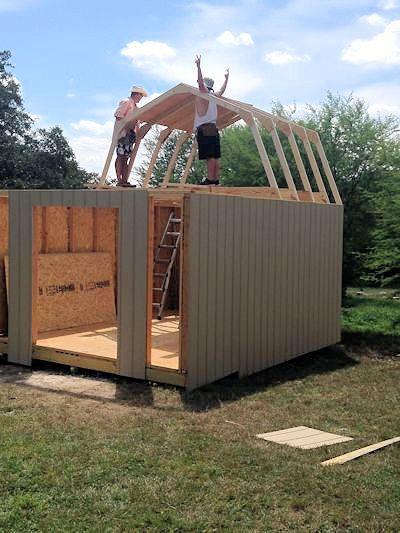
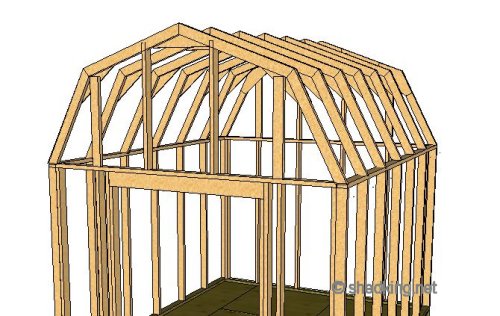 Shed Framed with Gambrel Trusses
Definitions of gambrel truss pieces
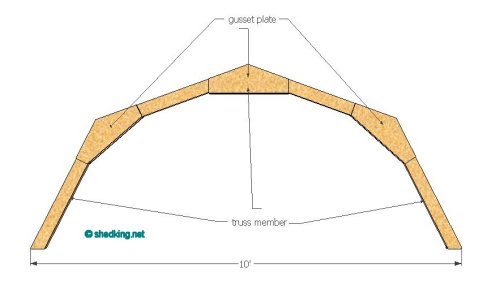 Building a Gambrel Shed Truss
Roof pitches are critical!
When you are designing your shed roof, whether it be a gambrel, gable, or saltbox, you should never have any roof pitch less than a 3-12. This means that for every 12" horizontal run, you must have at least 3" of rise. Anything less than this will ultimately result in a roof that leaks if you plan on putting shingles on it. Exceptions to this are using a metal roof, or a roof that has a rubber membrane that is glued down.
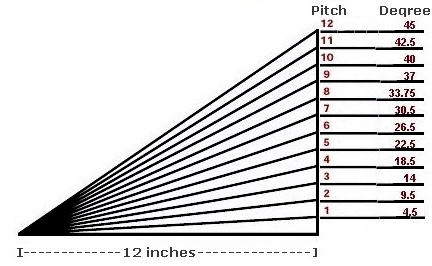 Gambrel Shed Roof Pitch and Corresponding Degrees
For our example the gambrel roof has two pitches, the top and the side.
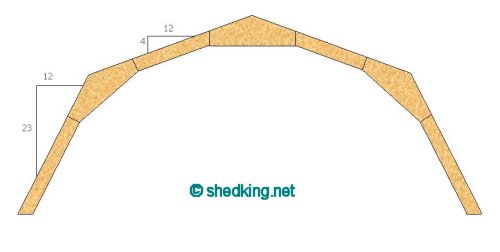 Two different roof pitches with a gambrel shed truss
The picture above shows a top roof pitch of 4-12, and a side pitch or 23-12. We do not have to worry about water penetrating the roof shingles with this example.
Here are the steps to use in figuring out the truss member lengths and end angles.
Step 1. Starting the Truss Dimensions
Find a nice wide open flat surface, such as your shed floor, or a garage floor. Our example will be for a shed that is 10' wide. Typically sheds are built so that the exact dimensions of your floor will be exactly equal to your shed size.
In other words, if you are building a shed that is 10' wide x 12' long, your shed floor after framed and sheeted with plywood or OSB will measure exactly 10' x 12'. And when you frame your walls the outside measurements from outside top plate edges will also equal 10'x12'.
Same thing if you have a concrete slab for your floor - it's going to be exactly 10' wide x 12' long.
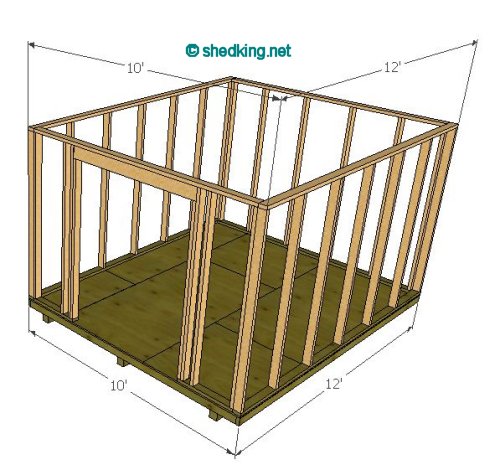 Our Example shed is 10' wide
So our first step is to snap a chalk line on your floor and measure off 10' on this line.
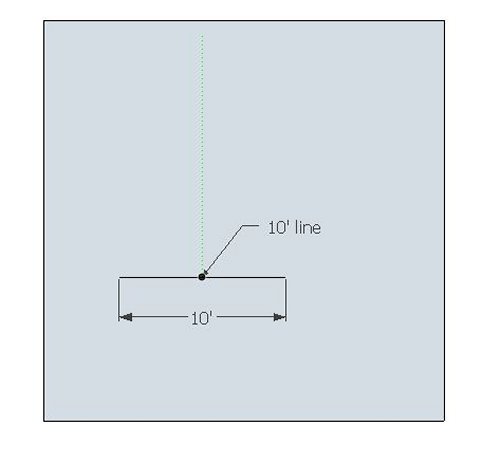 Step 1 for figuring out the dimensions of a gambrel shed truss
Step 2. Setting Up the Height of the Truss
Now using your 10' line find the exact middle and draw or snap a line perfectly perpendicular at the mid point.
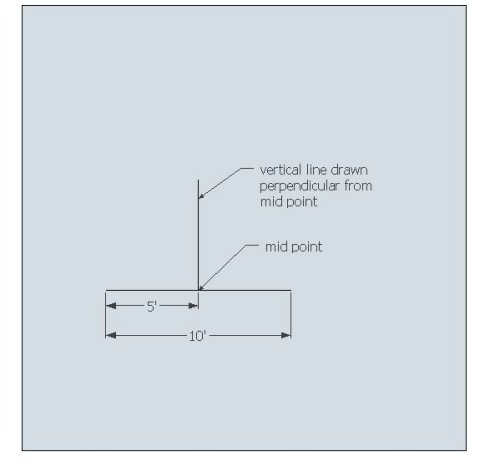 Draw your perpendicular line off the middle
We now have the basis for designing our gambrel truss, but first we have to find or make a line that measures 45 degrees off this midpoint section.
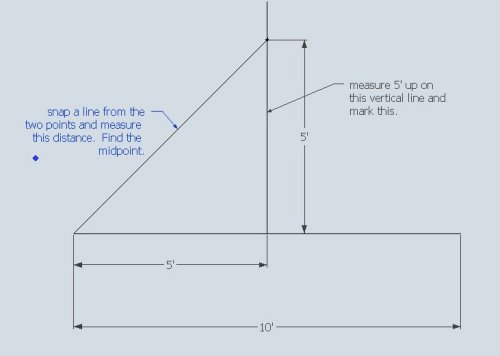 Finding the 45 degree point
Step 3. Finding the Measurement for the Mid-Line
Now that we have our 5' measurements off the horizontal line, and the vertical line, we can snap a line between these 2 points. Using this line, find the midpoint and snap a line from the original midpoint up through this new location. This will help us determine the exact distance for the top measurements of our truss pieces which will all be equal.
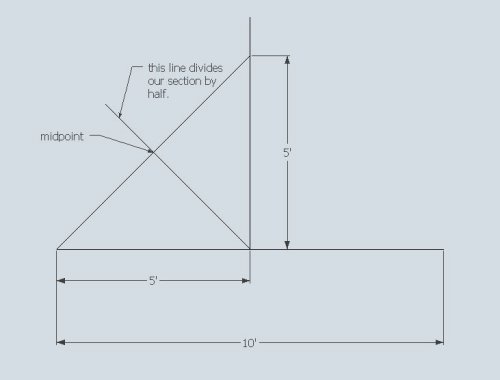 Determining a 45 degree line
Step 4. Getting the Mid-Point Measurement
Measure off 5 ' on the line that represents the 45 degree line off the midpoint. Now we have 3 points to use to determine out top truss measurements. Because of the 45 degree line we made, each of our truss pieces will have identical top and bottom measurements and identical angle cuts on each end.
Step 5. Truss Top Measurements
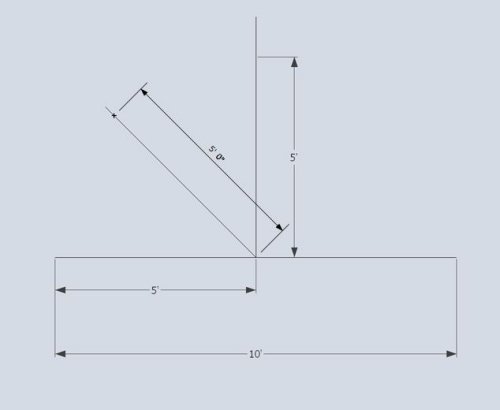 Measuring off a 5' dividing line
We now have three points to use that will give us the measurements for our gambrel truss pieces for this 10' wide shed. Draw lines between these 3 points to represent the top of the trusses, and measure down 3 1/2" off each line. This will represent a full 2x4. Given the fact that our middle line is at a 45 degree angle, this means that the end angles of each the truss pieces will be 22.5 degrees each.
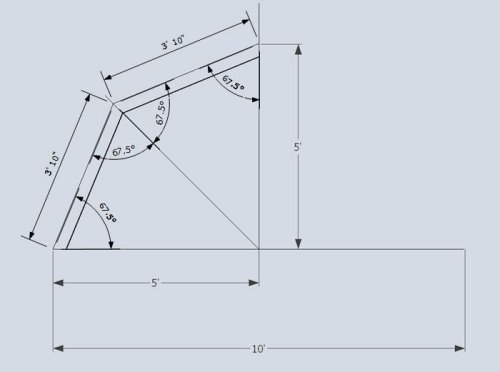 Gambrel 2x4 truss measurements defined
Now we know all the necessary measurements to cut and make our first truss. Each truss piece will be 3' 10" long on the top measurement and the angles cut will be 22.5 degrees off each end. The easiest way to get these angle measurements on the ends will be with the use of a speed square.
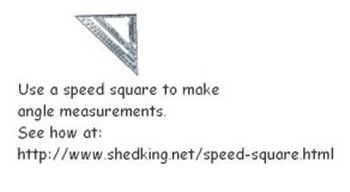 Using a Swanson Speed Square for Angle Measurements
Step 6. Transfer Measurements to 2x4's
Our next step is to transfer these measurements to a 2x4 and cut 4 pieces to form our first truss. Once all pieces are cut we can lay them out together so that they form a 10' wide gambrel truss.
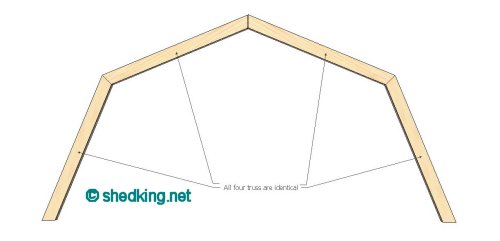 4 identical truss pieces for your gambrel shed roof
Check to make sure the width of your truss is exactly 10' from one bottom side to the other. There will be some play with your truss after the gusset plates are nailed on but it is critical with this first truss that it measures up. If it doesn't, make any necessary adujustments to it and record these adjustments so that the remaining trusses will be identical.
With your first truss measuring out ok, its time to cut and attach gusset plates. For the gambrel truss we will need 6 total gusset plates made out of 1/2" material like osb or plywood.
Step 7. Nail on Gusset Plates
Nail gusset plates to the truss at all 3 connection spots with 8d common nails, using 10 per connection, 5 per each truss end.
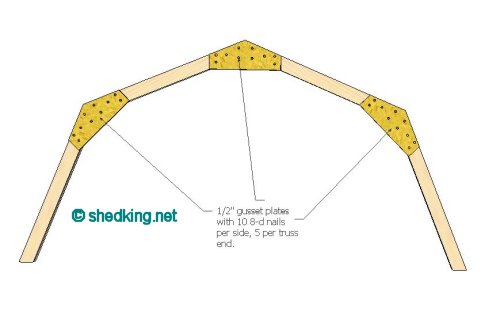 Gusset plates nailed in place
Step 8. Build a Jig
Making sure that the truss pieces line up correctly and they will indeed fit your 10' wide shed, we can make a jig using this first truss. Cut 4 more truss pieces and line them up in your jig, then continue nailing on gusset plates.
Assemble enough trusses for your shed roof. Usually going 2' on center with your shed trusses is sufficient, however 16" on center is better and the additional cost will be minimal for the added strength and support.
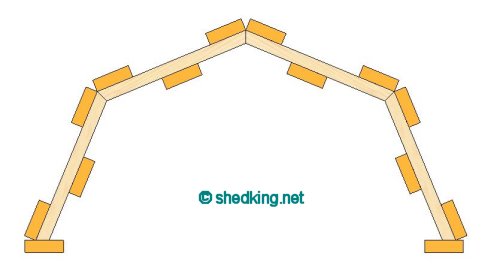 Jigs used for easier gambrel truss construction
If your shed wall studs are framed at 2' on center and you decide you want to go 16" on center with your trusses, then you will need 2 top plates. Generally if your trusses are going to match up with your wall studs, only one top plate is needed.
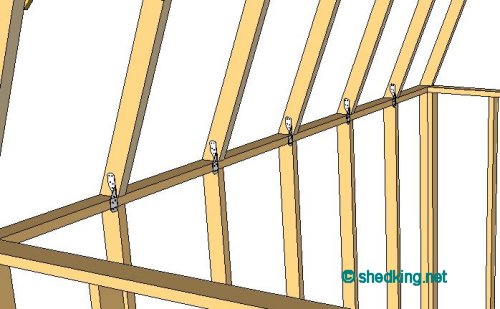 Local building codes may require hurricane ties to be used
Truss ends are toe-nailed to the top plate with 3-16d nails per end.
Step 9. Lower Siding, Ceiling Joists, and Loft Flooring
Our next step to do is add siding, ceiling joists, and loft flooring. The addition of loft flooring will make it easier to install your roof sheeting because for most of the upper panels you will be able to stand on the loft flooring.
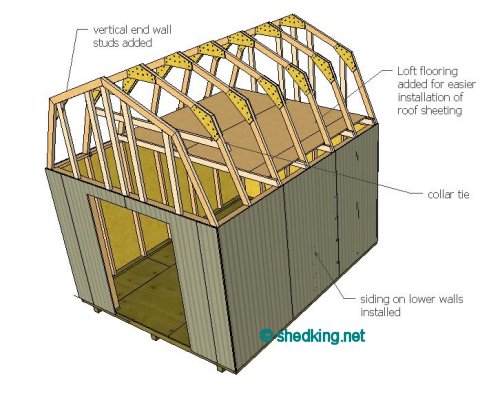 Siding, ceiling joists, collar tie(s) and loft flooring added
Additional bracing may be added across the trusses for more support. If this is done make sure each truss is exactly at it's on center location across the top.
Step 10. Roof Sheeting
Now that we have flooring down on our loft, we can start sheeting the roof with 1/2" osb panels. Start on one of the upper corners. Make sure the outside short edge of the panel is flush with the outside truss. Also make sure the osb or plywood top is even with the top of the outside truss. The top may not line up perfectly just yet with the rest of the truss tops, but we will line that up in just a minute.
With the outside edge flush, nail this edge every 8" with 8d common nails. The top of the sheet can now be nailed to the truss tops. You may have to pull or push the sheet to get it to line up but doing so will square up your roof framing. Once you have accomplished this, and your trusses are exactly on their on center locations, you can nail the sheet to the trusses in the same fashion. Use 8d common nails every 8".
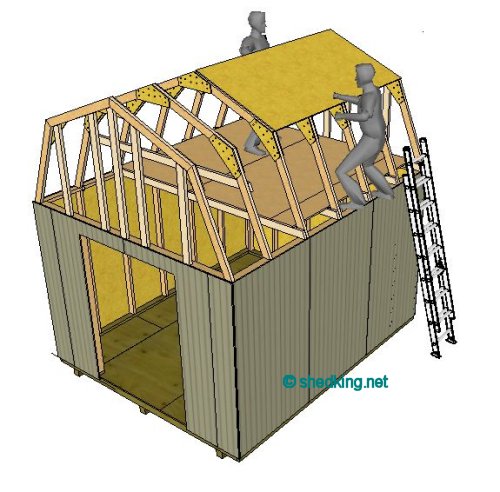 Starting the roof sheeting
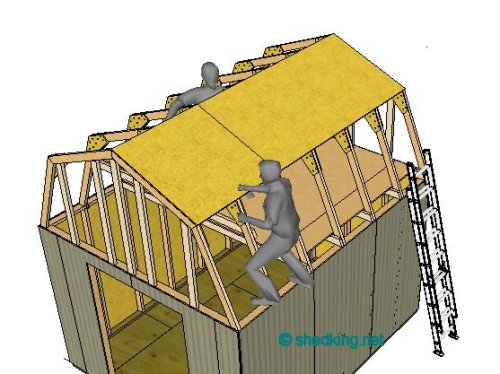 Second roof sheet is installed
Step 11. Continue Sheeting the Roof
Now that we have the top sheets nailed into place, and the roof has been made square, we can finish with the sheeting on the first side, then do the opposite side in the same manner.
One very important thing to remember when paneling or sheeting your roof is to stagger the panel joints for strength. Panels should all be nailed 8" along the perimenters and 12" in the field or inside trusses.
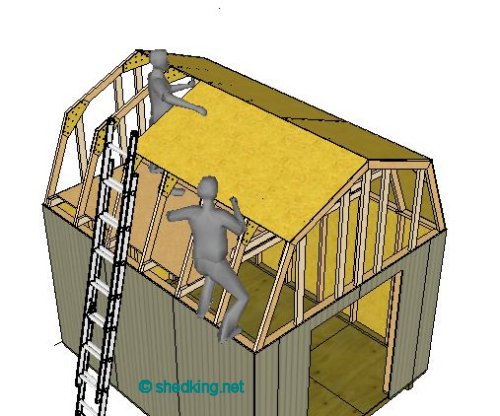 Continue sheeting the other roof side
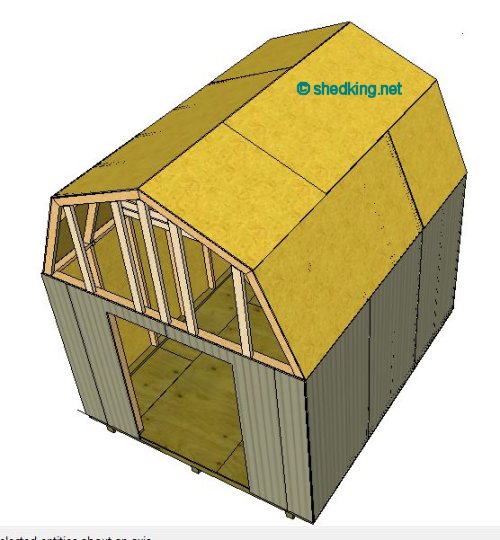 Roof sheeting completed with staggered end joints
Step 12. Venting and Overhangs
Upper end paneling is intalled on both ends of our gambrel shed. Venting can be accomplished by placing gable end vents on both ends up close to your ridge, or a ridge vent can be installed.
Overhangs should now be installed if desired. Overhangs can be constructed of 2x6's laid flat or toe-nailed on edge which are called fly rafters.
Another method of building front and rear overhangs is to take 2 trusses and make a ladder assembly out of them by nailing 2x4 struts between them. These ladder assemblys can the be nailed to the outside shed ends.
Instead of connecting your truss joints with wooden gusset plates metal mending plates can be used on both sides.
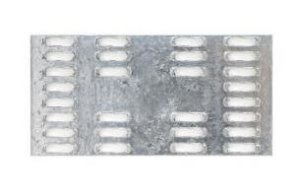 Using 2x4 simpson metal mending plates
It is not recommended to use these mending plates on the interior trusses.
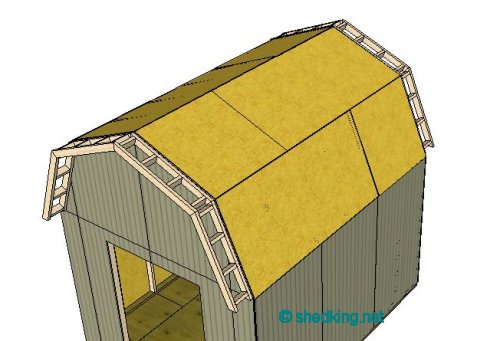 Building the front and rear overhang assemblies
If you choose to do the ladder overhang assemblies these can actually be installed befor your roof sheeting is put down. This way you can start your sheeting on the outside edges of your overhangs and much more strength will be gained from this.
Sheet the overhangs, and add corner blocking and side overhangs.
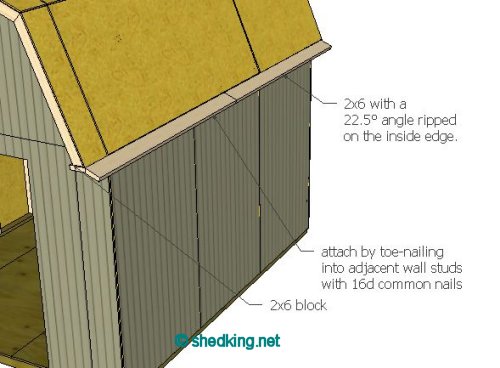 Overhangs sheeted, blocks added and side overhangs added
Step 13. Roofing Felt and Drip Edge
The next step is optional and that is putting down roofing felt paper or tar paper. This step is highly recommended for prolongling the life of your shed as it will help protect the osb or plywood sheeting underneath it.
Roofing felt comes in 15# weight or 30# weights. The 15# is commonly used however if your roof slope is very low like a 3/12 pitch, 30# is recommended. For our shed 15# will do just fine.
Also recommended is using drip edge along all perimenter edges of your roof for further protection.
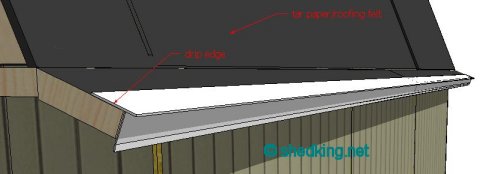 Roofing felt paper and drip edge added
Step 14. Putting Down Shingles
Now that we have our roof felt paper down and drip edge installed around all the perimenters of the roof sheeting, its time to put shingles on the roof. Either 3-tab shingles or dimensional shingles are fine. I've found that dimensional shingles are much easier to install and much more durable than 3-tab shingles, but also cost more.
For a shed or small barn, you aren't going to be putting down a whole lot of shingles so the extra cost is minimal and well worth it. You should however try to match up what is currently on the roof of your home!
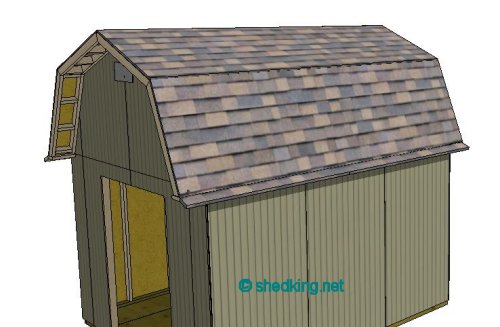 Your Shed Roof Gambrel Style is Completed
Monthly DIY
Shed-in-sight
Newsletter
Subscribing will get you discounts on shed plans, monthly updates, new shed design ideas, tips, exclusive discounts on shed building resources and tools. Learn more here.
Recent Articles
-
Pictures of Sheds Built By Shedking Customers
Dec 07, 25 07:39 AM
Visit our library of pictures of sheds built from our shed plans. Get great shed design ideas and plans for storage sheds, garden sheds and more. -
How To Solar Power A Shed
Oct 24, 25 09:28 AM
how to solar power a shed -
Ways to Make Money From Your Shed: 100+ Ideas and Side Hustles
Oct 05, 25 06:51 AM
Backyard bucks: Explore 100+ profitable ways to make money from your shed. Turn your backyard shed into income machine.
My You Tube Videos


