Want to Save 30% off Any Shed Plan Purchase!
Signup For My 'Shed n Sight' Newsletter
and Get Your 30% off Promo Code To Use At Checkout.
- Home
- How to build a shed
- Shed Foundation Options
Diy Shed foundation options: Building your shed base
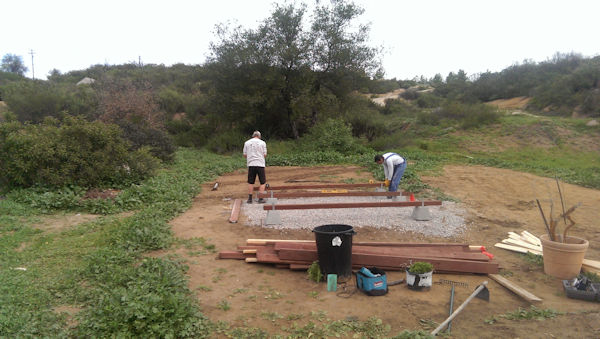 Diy Shed Foundation Options
Checkout all the diy shed foundation options below and pick the one that's best for building your new shed. Building the right foundation for your new shed that's done right from the get go is so important for the life of your shed. If not done properly, the construction of your new shed will be a struggle. You will probably encounter everything from walls not lining up to roof sheeting not fitting properly.
Down the road there is also a likely chance that you will experience things like your shed doors not closing properly, windows not opening right, and leaks from your roof, just to mention a few!
What's the best foundation for your shed? The best shed foundation options, like a concrete slab or wooden floor on concrete piers, may be out of your budget. So going with something like gravel shed foundations would be a great option and may be the best choice depending on your budget. Also, choosing the proper foundation will depend on factors such as the type of storage shed you are wanting to put up, the size of your shed, soil conditions, frost line, the ground level, if you have flat ground, and your local zoning laws.
Diy Shed foundation options to pick from:
- Wood frame shed floor with skids on compacted gravel base
- Skid foundation
- Concrete shed floor or concrete pad
- Wooden shed floor on concrete piers
- Wooden shed floor on solid concrete blocks
- Wooden shed floor on concrete deck blocks
- Wooden frame shed floor on concrete pavers
- Shed floor on timber frames or post foundation
- Plastic foundations
- Shed floor on helical piers or Screw Piles
- Metal shed foundation
Compacted Gravel Pad Base Foundation
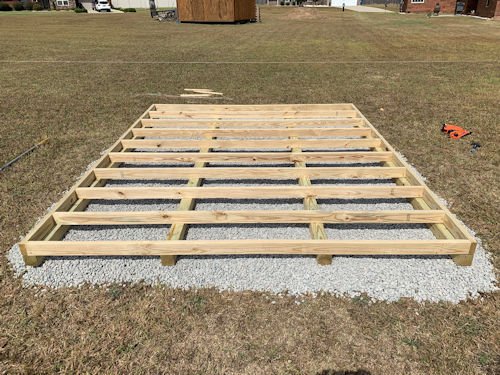 Wooden Shed Floor On a Gravel Pad Foundation
A gravel foundation for a shed is a popular, cost-effective option, and adaptable option for your shed foundation. The depth of the gravel base is crucial to the stability of the shed, and typically ranges from 4 to 6 inches, but larger or heavier structures might need up to 12 inches.
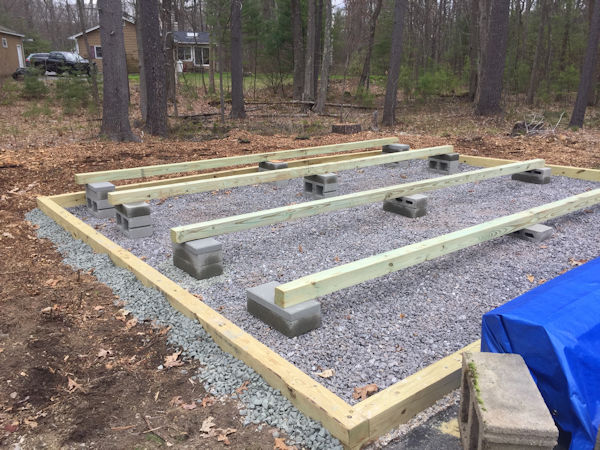
Of course if you go with the gravel base, your shed floor should be built with support skids such as 4x4's or 4x6's with the floor framing on top of the skids. The other option is to use concrete deck blocks set on your gravel pad for support for the wooden shed floor.
Pros of a gravel shed base:
- Good drainage.
- lower costs than other foundations.
- ease of preparation.
- flexibility, and a natural appearance.
Cons:
- The need to regularly maintain the base.
- lesser stability than concrete slab foundations.
The cost of a gravel pad varies, but is generally the most economical choice, typically costing around $1-$3 per square foot for materials. Other foundation types, such as concrete slab or pier and beam foundations, usually cost more due to material and labor costs.
In order to go with the gravel base, you should have a somewhat level area. You will also need to figure out the correct amount of gravel, and incorporate retaining walls, such as treated 4x4's, or dig your ground out to at least 4". The depth of the gravel base is crucial, and can be determined by the size and weight of the shed, as well as local conditions.
If doing a gravel pad base for your shed, I have a ton more information here.
Skid Foundation
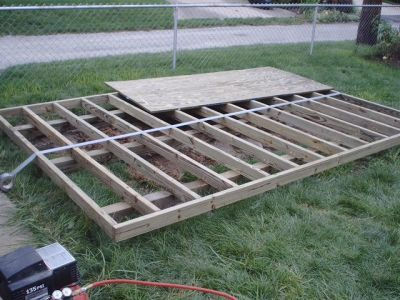 Treated Skid Foundation For A Shed
A skid foundation for a shed consists of a set of wooden beams or skids (usually pressure-treated lumber) that support the weight of the shed and distribute it evenly across the ground. The skids are set on a bed of compacted crushed rock for drainage and to prevent rot. They are particularly suitable for any size shed. The size of the skids can be 4"x4" or 4"x6".
Pros of a Skid Foundation:
1. Easy to Construct: Skid foundations are relatively simple to build and typically don't require a lot of special tools or advanced carpentry skills.
2. Portable: One of the biggest advantages of skid foundations is their portability. Because the shed is not permanently attached to the ground, it can be moved if necessary.
3. Less Expensive: Skid foundations, especially those built with pressure-treated lumber, can be less expensive than concrete or pier foundations.
4. Off-Ground Storage: A skid foundation raises your shed off the ground, providing extra protection against water damage and pests.
Cons of a Skid Foundation:
2. Leveling Issues: If your ground is very uneven, a skid foundation may require additional work to level correctly.
3. Permanence: Unlike a concrete slab or pier foundation, a skid foundation is not a permanent solution and may have a shorter lifespan.
4. Limited Use: In some areas, local building codes may restrict the use of skid foundations for larger sheds or outbuildings. Always check with local regulations before proceeding with any type of shed foundation.
Concrete Shed Floor
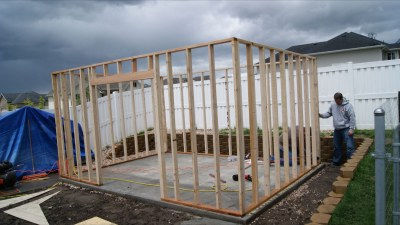 Concrete Shed Foundation - A Permanent Foundation!
If you want a totally strong foundation, this is in my opinion of all the foundation types the best option! This type of shed foundation is a concrete slab foundation.
It will provide an absolutely solid base and is permanent. A concrete foundation for your shed is a definite must have if you plan on keeping very 'heavy equipment' in your shed.
Typically you would want to have a 4" base of compacted crushed rock under your 4" concrete slab. Your slab can also have concrete footings. This would entail making the outside perimeter of the slab, usually about 8" all the way around, deeper than 4". This provides much more support for your shed walls.
If you would like to learn more about going with a concrete slab for your shed foundation please follow this link: Permanent shed foundation.
Wooden shed floor with concrete piers/anchors
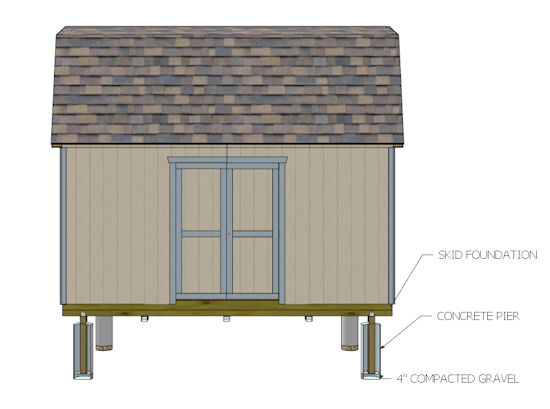 Shed Floor With Concrete Piers/Anchors
Building a wooden shed floor with support skids under it and anchoring the floor down with concrete piers in each corner is a very popular option and one of the most widely used methods of building a shed foundation. For smaller sheds that I built I would most normally use just 2 concrete anchors and they would be caddy corner with each other.
3d View of a Wooden Shed Floor With Concrete Piers and Blocking
This is the one method I use more than any for my shed foundations and it was one of the most widely accepted methods when applying for a permit. Normally when I get to the jobsite to build a shed, I would first build the shed floor, then mark off my locations for the concrete pier foundation, slide the floor over, dig the holes, then call the inspector to come out and make sure the holes were up to code.
Once that inspection was done, I could then finish building the shed, then I would call the inspector for a final inspection.
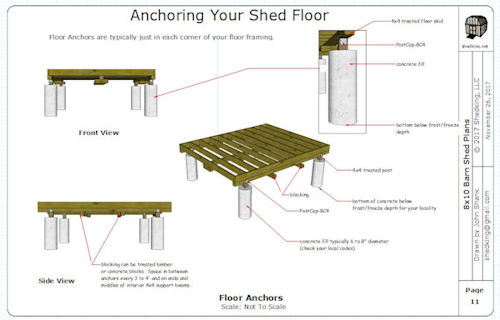 It's Important To Anchor Your Shed Down!
If this is one of the diy shed foundation options you'd like to learn more detail about please have a look on my how to build a shed floor page.
Shed floor on solid-concrete blocks
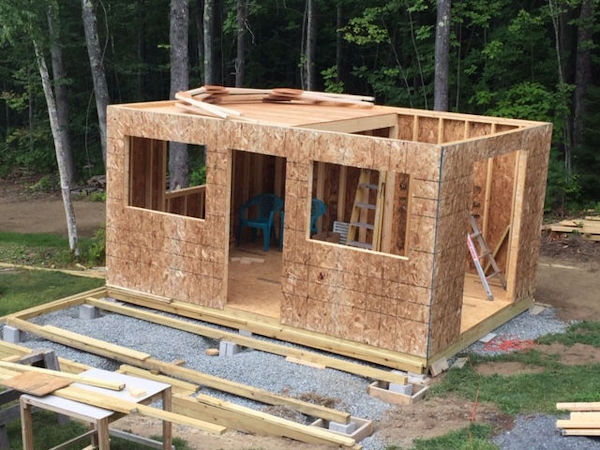 Shed Being Built With Solid Block Foundation
I see a lot of sheds supported with concrete blocks under them for support. I am not a big fan of this type of foundation because with very inclement weather the shed can 'move' on this type of support. What this causes down the road is possible problems with doors not opening correctly. Cracks in walls, leaks in roofs, and possible heaving up an down of the blocks due to water freezing and thawing under them.
The best way to set up your concrete blocks if you decide this is the best route to go would be to have compacted gravel under each block. You should also build your shed floor on skids and have the skids resting on the blocks, which should really be no further than 4' apart.
-Some pros of a wooden framed shed floor on solid concrete blocks:
1. Elevation: Placing the wooden floor on concrete blocks lifts the structure off the ground. This can prevent water damage, decay, or insect infestation.
2. Ventilation and Drainage: A raised floor allows for better air circulation and moisture distribution, thus helping to prevent rot and mold growth on the wooden floor.
3. Cost Effective: Compared to other foundation options, solid-concrete blocks are relatively cheap and easy to set up.
Cons of Having a Wooden Shed Floor on Solid-Concrete Blocks:
1. Pressure Points: Blocks can focus the shed's weight on certain points, which may lead to an unequal distribution of weight. This can cause pressure points and potentially damage the wooden floor in those spots over time.
2. Requires Level Ground: The ground needs to be perfectly level to correctly install blocks, which might require extra preparation or hiring a professional.
3. Movement Over Time: Concrete blocks may shift or move over time due to weather conditions, ground movement or heavy weight. This could lead to an unstable or un-level floor.
4. Maintenance: The wooden floor will eventually require maintenance as it is more susceptible to weather decay and insect infestations than a concrete floor.
5. Potential Permit Requirements: Some local regulations may require a permit or inspection for a block foundation, particularly for larger sheds. Some localities may not allow for your shed floor to rest on blocks. It's a great idea to check with your local building department before going this route.
Wooden shed floor on concrete deck blocks
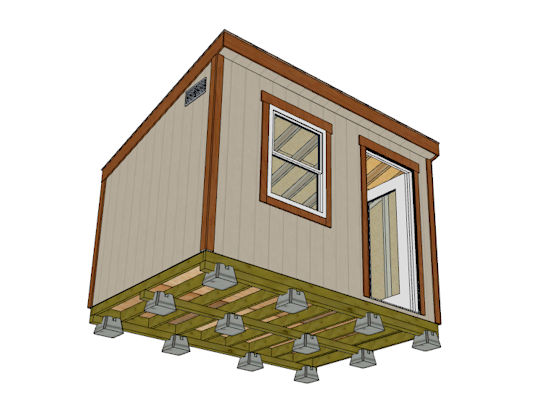 Wooden Shed Floor On Deck Blocks
This is probably my least favorite of all the diy shed foundation options. Concrete deck blocks are made such that you have to lay 2x or 4x material vertically in the groves.
The use of deck blocks is easier and more cost efficient if you get the deck blocks that accept 4x4 or 4x6 treated skids. You can place your deck blocks in their appropriate locations, set the 4x skids in them, level them out, then build your shed floor on top of the skids.
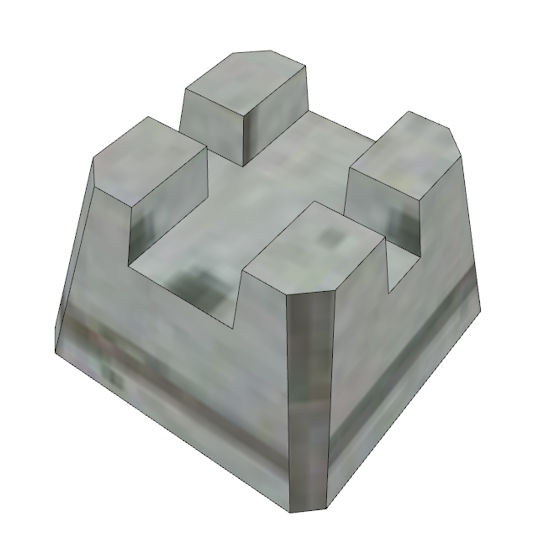 This Deck Block Good For Both 2x4 or 4x4 Material
If you plan on just going with deck blocks that only accept 2x material, then you'll have to have so many deck blocks to support your shed floor not just along the outside floor framing but also within the interior floor joists. What this means for example is say you have a 12' x 16' framed up shed floor with 13 interior floor joists.
To support this floor framing you should have a concrete deck block no more than 4'. That's 4 concrete deck blocks per joist and if your joists are 16" on center
you would need 52 deck blocks and each of these blocks has to be level with one another! Wow what a lot of work that's going to be. And to top it all off, your shed floor is going to be very high off the ground.
Pros for using deck blocks:
Fast, fairly simple and economical shed base/foundation.
Cons of using deck blocks:
Your shed floor is going to be very high off the ground
Some shifting could occur over the years causing some structural issues with your shed
Concrete or plastic Pavers
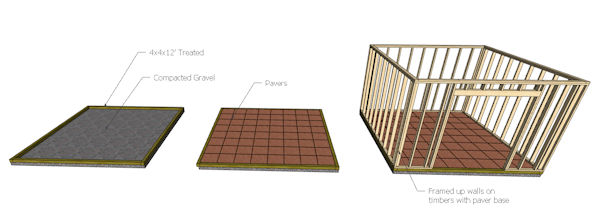 Paver Shed Foundation/Floor
A paver foundation, in the context of building and construction, are essentially materials – usually in the form of precast pieces of bricks, concrete, or natural stone, or plastic – that can be used for the floor of your shed. They are commonly used due to their increased longevity and aesthetic value compared to poured concrete.
Pros of using pavers:
1. Easy Installation: Concrete and plastic pavers can usually be installed with few specialized tools and a bit of manual labor. You do not need special training to achieve a well-laid paver shed base.
2. Aesthetically Pleasing: Pavers come in a variety of shapes, sizes, and textures, adding aesthetic appeal to your shed base compared to other types of foundations.
3. Durability: Concrete pavers are highly durable, and can withstand significant weight and weather effects.
4. Repair and Maintenance: If a paver gets damaged, you can readily replace only the broken piece without disrupting the entire structure, making the repair process easy and cheap.
Cons for using pavers:
1. Ground Preparation: The ground must be properly prepared before laying pavers. This involves clearing and leveling the plot, which can take time and effort.
2. Weeds: Over time, you might find weeds growing in the spaces between the pavers. This will require occasional maintenance to remove.
3. Not Suitable for Heavy Sheds: While pavers can support the weight of most average-sized sheds, they may not be the best option for larger, heavier sheds which require more support.
4. Potential for Shifting: If the preparation and installation is not done properly, pavers can move or shift over time.
Timber frames or post foundations for sheds
This type of shed foundation can be used for a timber framed post style shed, and it can be used for a traditional framed shed. With a timber framed, your walls and floor and roof are timber framed and not the typical framing used which is stick built. Stick built sheds are floors, walls, and shed roofs built with studs usually 16" on center to 24" on center.
With timber frame sheds, wall posts could be 4x4's spaced 24" to 48" with 2x4 purlins nailed horizontally across the posts for siding attachment.
A timber framed or post type shed foundation would basically be your shed floor with the walls framed on top of the timber. You would have the options of first having a bed of compacted gravel down with your timbers resting on the gravel. Or you could have the timber frame supported with concrete blocks or use concrete piers.
Plastic shed foundations
With plastic shed foundations or floors, there are available plastic grids you can lay down and fill with gravel to come up with a nice gravel base for a shed built with skids and wood floor. A plastic shed base is a great option for keeping the gravel in place under and around your shed.
Of all the shed foundation options available this one I think is probably not very common, but a very viable shed foundation option.
Helical Piers and Screw Piles

Helical Pier or Screw Pile
Helical piers, also known as helical piles, screw pile or anchors, are a type of deep foundation used in construction. They are steel rods with helical blades attached, and are embedded deep into the ground to support structures, reduce foundation settlement and provide a strong anchor point.
Helical piers are particularly useful if you're building a shed on ground where the soil is soft, as they can be driven deeply enough to reach more stable, hard soil. They can even be used in places where the ground may be inclined or uneven, making them versatile for different terrains and soil types.
Here are some of the pros and cons of using helical piers for a shed foundation:
Pros:
1. Stability: Helical piers are screwed deep into the ground until they reach more stable soil or bedrock, providing a solid base for structures of various sizes and weights.
2. Speed and Ease of Installation: Unlike traditional concrete foundations which require curing time, helical piers can be installed quickly, and construction can proceed immediately after installment.
3. Versatility: They work well in a variety of ground conditions, including areas with high water tables, weak surface soils, liquefiable soils and in areas with tight access.
4. Eco-Friendly: Helical piers cause minimal ground disturbance during installation and are easily removed and reused, making them a more environmentally friendly option.
5. Adjustability: Unlike traditional foundation methods, helical piers can be adjusted even after installation. This helps in ensuring that the shed is level and properly aligned.
Cons:
1. Potential for Damage: If not properly installed, the piers can potentially damage underground utilities like gas lines or plumbing.
2. Limited load-bearing ability: Although helical piers can support a substantial amount of weight, there is a limit. Very heavy buildings might require a different foundation type.
Considering these pros and cons should make it clear that while helical piers can be an excellent choice for your shed foundation, they aren't the perfect solution for every situation. It's best to consult a professional to discuss what type of foundation will best suit your needs and budget.
Metal Shed Foundation

Here's A Metal Shed and Metal Shed Floor On a Wooden Shed Base
This one is typically associated with pre-fab metal sheds. However, I have seen shed floors framed with steel joists and then a wooden floor can be screwed down to the metal frame.
If I was going to erect a metal shed, I would not put it on a metal floor as they could rust over a period of time from ground moisture. I would instead build a wooden shed floor on skids, anchor the floor, then build my metal shed on top of the wooden floor. One other option would be to screw the metal floor down to the wooden shed base if it's necessary to build the metal shed to the metal floor for stability.
Building Codes and Shed Foundations
Specific national building codes related to constructing a shed foundation can vary depending on the country. In the United States, for instance, shed regulations typically fall under local jurisdiction, and specifics can vary considerably from one city or county to another.
However, several common factors are generally taken into account for local zoning laws:
1. Size of the Shed: Smaller sheds (those under a certain size, typically 100-200 sq. ft) often do not need a building permit, but larger structures usually do.
2. Shed Use: If the shed is used for storage purposes only, the regulations may be less stringent than if it's used for living or working purposes.
3. Foundation Type: Certain types of foundations may be required for larger sheds, or in areas with specific soil or environmental conditions.
4. Location and Setback: There may be requirements or restrictions about how close a shed can be to property lines, other buildings, septic tanks, etc.
In general, it's essential to consult with your local building department or local building inspector, to understand the specific rules and regulations in your area before starting on a shed foundation construction project. They can provide guidance on required permits, inspections, codes, and safety regulations that are specific to your locality.
Regardless of building codes, any shed foundation should be constructed to be sturdy, level, and able to adequately support the weight of the structure. It should also be built to endure the specific environmental conditions of your area, like heavy snow loads, high winds, or seismic activity.
About this article
The author, John Shank, owner of shedking.net, used AI to research this topic and his 25 years of construction experience, on diy shed foundation options. The author then wrote this entire article, optimizing its content and value for you the reader. As such, he takes ultimate responsibility for the content of this publication. Also, utilizing AI as an assistant means he can write better, more interesting articles - just for you - on a regular basis.
Monthly DIY
Shed-in-sight
Newsletter
Subscribing will get you discounts on shed plans, monthly updates, new shed design ideas, tips, exclusive discounts on shed building resources and tools. Learn more here.
Recent Articles
-
Does Your Shed Need Shed Floor Skids?
Feb 12, 25 05:53 AM
Shed floor skids will help support your shed floor. They will also allow you to anchor your shed floor to the ground using concrete piers. See how here. -
Gusset fasteners
Feb 06, 25 06:31 AM
For fastening gussets to shed trusses, is it best to use nails or bolts? -
Easy Diy Shed Plans and Ideas For You To Build Sheds
Dec 31, 24 09:49 PM
All types of shed plans for gable, barn, saltbox, and lean to style sheds small and large that can be used for storage, shed to house, workshops and more.
My You Tube Videos


