Want to Save 30% off Any Shed Plan Purchase!
Signup For My 'Shed n Sight' Newsletter
and Get Your 30% off Promo Code To Use At Checkout.
- Home
- Proper Shed Building Tips
- Gravel Base for a Shed
How deep should a gravel shed base be for a shed?
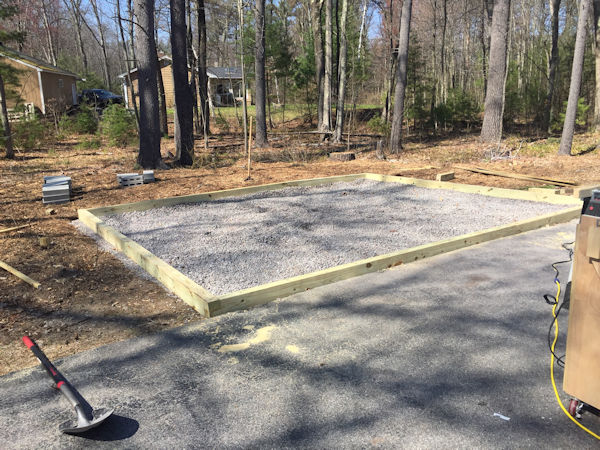 Making A Gravel Shed Base
A gravel shed base is a popular option for many types of sheds and can provide a strong, level base for your structure. Whether you’re building a new shed or replacing an old one, this may be the right foundation for you to use.
It’s important to know how deep your gravel base should be to ensure that your shed is stable and secure. I'll discuss the importance of getting the depth of your gravel pad base right, and provide expert advice on how to create a gravel base for your shed.
What are the pros and cons of using a gravel base for a shed?
Using a gravel base for a shed offers a
number of benefits, but also comes with a few drawbacks. Let's take a
look at some of the significant pros and cons:
Pros:
1.
Drainage: A gravel base allows water to drain away, preventing the
buildup of moisture which can lead to rot and decay in wooden sheds and
rust in metal ones.
2. Affordability: Compared to other shed
foundation options like concrete, a gravel base is usually less
expensive, especially if you plan on doing the project yourself.
3.
Straightforward Installation: Preparing a gravel base doesn't require
professional skills. You can likely do it yourself with the right tools
and guidance.
4. Flexibility: Unlike concrete, a gravel
foundation can easily adapt to a certain degree of ground movement,
decreasing the likelihood of structure damage in areas with expanding
and contracting soil.
5. Natural Appearance: A gravel base can
blend well with a variety of landscapes, providing a more natural look
compared to concrete or plastic bases.
Cons:
1.
Maintenance: Over time, gravel can erode or shift, especially on uneven
or sloped land. The base will need regular checks and possibly
additional gravel to keep it level and solid.
2. Stability: While
generally solid, a gravel base is not as stable as a concrete slab
foundation. This might be a disadvantage for larger, heavier sheds or
those constructed on soil that is prone to becoming waterlogged.
3. Pests: Small rodents can potentially burrow through the gravel and set up home beneath your shed.
Remember,
the right foundation for your shed will ultimately depend on a variety
of factors, including the size and intended use of your shed, as well as
local weather and soil conditions.
Important steps for creating a gravel shed base
When building a shed, one of the most important steps is creating a solid foundation that can support the shed floor structure. Many people opt for a gravel shed base, which is a layer of gravel spread over the area where the shed will be built. The gravel pad base provides a strong, level base and helps protect the shed from shifting. However, it’s important to get the depth of the gravel base right in order to ensure that your shed is secure and stable. In this article, we’ll discuss the importance of getting the depth of your gravel pad base right, and provide expert advice on how to create a gravel base for your shed.
What Is the Best Way to Create a Gravel Pad Base for My Shed?
How to measure and mark the area for the gravel base?
Creating a gravel shed base requires precise measurement and marking. Here's how to measure and mark the area:
1.
Decide on the Location: First, decide where you want to place your
shed. This could be a flat location with good drainage and reasonable
distance from trees that can cause damage or obstruct construction.
2.
Measure the Area: Once you've chosen the location, measure out the area
for your shed. Typically, you should make the area larger than your
shed by about 1 foot on all sides. This extra space will provide better
support and improve drainage. Use a tape measure to calculate the length
and the width of the base.
3. Mark the Area: Using pegs or wooden stakes, mark the four corners of the measured area.
4.
Check for Alignment: Use a string line tied between the pegs to create
an outline of the base. Make sure that the lines are straight.
5.
Check for Square: Make sure your corners are square (90 degrees). This
can be done by using the 3-4-5 rule. Measure 3 feet from the corner
along one side and mark it. Measure 4 feet from the corner along the
other side and mark it. The diagonal between these two marks should be
exactly 5 feet if the corner is square. Repeat this process for all
corners.
6. Level Check: The area for the shed should be
reasonably level, although a slight slope (less than 3%) for good
drainage is acceptable.
7. Mark the Height: Once the area is
leveled, you can mark the desired height of the gravel base onto the
stakes, using the spirit level and tape measure. The recommended depth
for a shed base is between 4 to 6 inches.
8. Digging: Now it's time to dig out the marked area to the depth marked on the pegs.
9. Final Check: Once you've dug out the space, do a final check with your spirit level to make sure the ground is even.
Once
you are done measuring and marking, you're ready to move on to the next
steps of your project: laying down landscape fabric, adding crushed
stone and gravel, and compacting and leveling your base.
What Is the Right Amount of Gravel for My Shed?
How does the size and weight of the shed affect the depth of the gravel base?
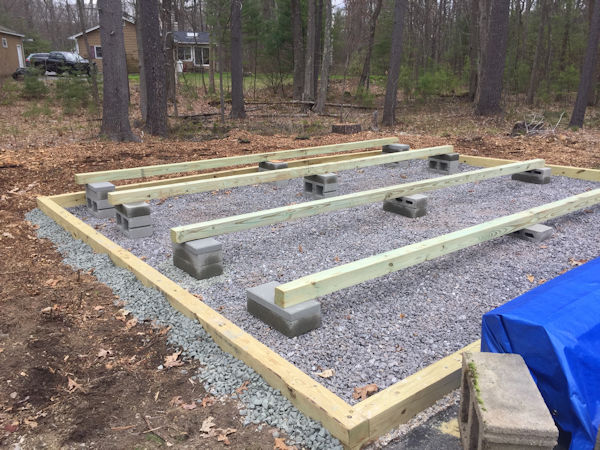
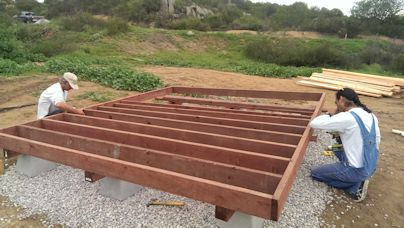 Wooden Shed Floor on Blocks With a Gravel Pad
The size and weight of the shed
significantly impact the depth of the gravel base for your shed
foundation. In simple terms, the heavier the structure, the deeper the
gravel base needs to be. Here's why - a deeper gravel base provides a
more solid and stable footing, reducing the chances of the shed
transforming from a charming lean-to into a disheartening slump-to.
A
shallower base might suffice for a small, light garden shed used for
storing lightweight items like garden tools, whereas a more substantial
workshop or storage shed would need a deeper base to ensure it stays
level over time.
As a general rule of thumb, the depth of the
gravel base should be between 4 to 6 inches. For larger, heavier
structures, you might need a base up to 12 inches deep. This depth
provides a strong base for the heavier weight and also allows for better
drainage.
However, it's essential to take into account factors
such as the type of soil, local climate, and intended use of the shed.
On soft and wet ground, you may need a deeper base for better support
and drainage. An area with heavy rains or snow, which may contribute to
ground shifting, should also consider a deeper base for better
stability.
Consult with a local builder or contractor to
understand specific requirements for your region and your shed. Always
remember, a strong and sturdy foundation will extend the life and
usefulness of your shed.
Use this calculator to figure how much gravel you will need for your gravel foundation
Calculator for amount of gravel needed for your gravel base
What tools and materials are needed to create a gravel base for a shed?
Creating a gravel base for a shed is a
straightforward process. Here are the tools and materials you'll need to
complete the job:
Tools:
1. Shovel – To excavate the site of the base.
2. Rake – For leveling the ground and spreading the crushed stone and gravel.
3. Tamper or Plate Compactor – To compact the crushed stone and gravel, making them firm and level.
4. Compactor Sand – This can be used if needed to fill small gaps and to provide an additional level of stability.
5. Spirit Level – To check that the ground is level.
6. Tape Measure – To guide the dimensions of the area.
7. Stakes – To delineate the area where the foundation will be.
8. String Line – To ensure straight and level boundaries.
Materials:
1.
Gravel – this is the primary material for your shed's base. Coarse
gravel is a good choice for a shed base, it provides good drainage.
2. Crushed Stone – This is used below the gravel to form a sturdy base.
3. Landscape Fabric – This fabric goes underneath the crushed stone to help with weed control.
4. 2x4 or 4x4 Inches Lumber – These are useful to create a frame for your gravel pad, helping to keep the stones in place.
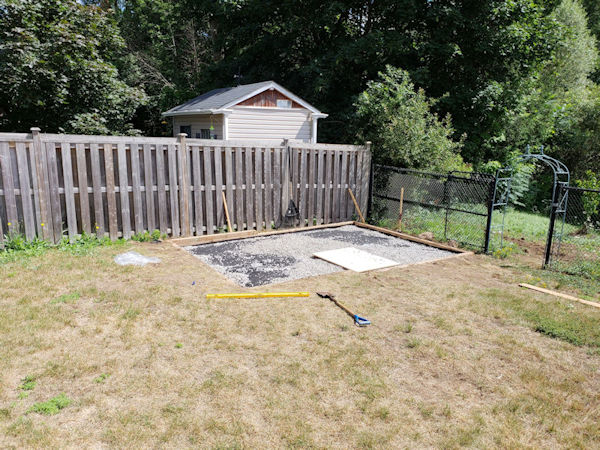 A Frame Made From Treated 4x4's Is Great For Keeping Your Gravel In Place
What are the cost differences between a gravel base and other types of shed foundations?
The cost of a shed foundation can vary
greatly based on the materials used, the size and complexity of the
foundation, and whether you hire a professional or do it yourself. Here
are approximate cost comparisons for different shed foundation types:
1.
Gravel Pad: This is usually the most economical choice among different
shed foundation types. Materials like crushed stone and pea gravel are
relatively inexpensive and can often be installed by the owner. The cost
is typically around $1-$3 per square foot for materials. If you hire a
professional, labor costs will add to this number.
2. Concrete
Slab: This type of foundation often costs more due to the materials and
labor involved. The cost of concrete itself can range from $4 to $6 per
square foot but could increase, depending on the market and location.
Adding labor costs to it, if hiring professional help, you could bring
the total cost to between $7 and $12 per square foot.
3. Pier and
Beam Foundation: The cost of a pier and beam foundation can vary
considerably based on the type of piers used (wooden vs. concrete), the
number of piers necessary for the shed size, and the complexity of the
installation. Generally, you can expect it to range from $5 to $10 per
square foot for materials and professional installation.
4.
Plastic Shed Base: These can range in price, but they are generally not
as cheap as a gravel pad, and not as expensive as a concrete slab. They
can cost around $4 to $6 per square foot for the plastic grid system.
The cost could be slightly higher when you include the price of the
filling material (gravel or concrete).
Please keep in mind that
these prices are estimates and can vary based on numerous factors,
including geographic location, size of the shed, current market value of
the materials, and whether the installation is a DIY project or carried
out by a professional. Always do your research and get several quotes
before beginning any construction project.
What are some tips for building a gravel shed foundation for your shed?
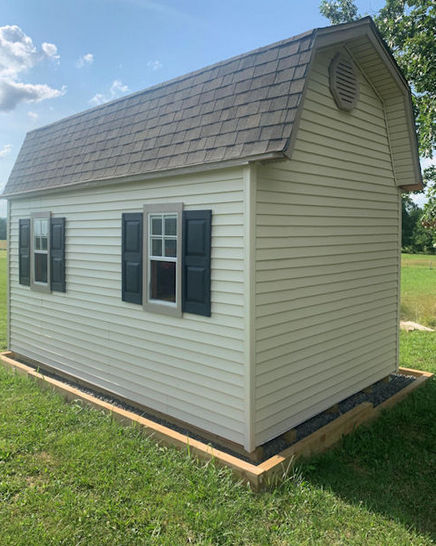 Shed On a Gravel Foundation
When building a strong foundation for your shed, there are several tips to keep in mind. First, make sure that the area where you’re building the shed is level. If the ground is not level, use a tamper to level it out before you begin building. Second, be sure to use the right amount of gravel for the size of the shed and the type of foundation you choose. Third, use a retaining wall around the perimeter of the pad to keep the gravel in place. Finally, be sure to use crusher run, which is a type of gravel made up of small stones and dust, for the best results.
Conclusion
Creating a gravel pad base for your shed is an important step in ensuring that your shed is secure and stable. It’s important to get the depth of the gravel pad base right and to use the right amount of gravel for the size and weight of the shed. It’s also important to use a tamper or heavy equipment to level the gravel out and to use crusher run for the best results. By following these tips, you can create a strong foundation for your shed that will last for years to come.
Monthly DIY
Shed-in-sight
Newsletter
Subscribing will get you discounts on shed plans, monthly updates, new shed design ideas, tips, exclusive discounts on shed building resources and tools. Learn more here.
Recent Articles
-
Does Your Shed Need Shed Floor Skids?
Feb 12, 25 05:53 AM
Shed floor skids will help support your shed floor. They will also allow you to anchor your shed floor to the ground using concrete piers. See how here. -
Gusset fasteners
Feb 06, 25 06:31 AM
For fastening gussets to shed trusses, is it best to use nails or bolts? -
Easy Diy Shed Plans and Ideas For You To Build Sheds
Dec 31, 24 09:49 PM
All types of shed plans for gable, barn, saltbox, and lean to style sheds small and large that can be used for storage, shed to house, workshops and more.
My You Tube Videos


