Want to Save 30% off Any Shed Plan Purchase!
Signup For My 'Shed n Sight' Newsletter
and Get Your 30% off Promo Code To Use At Checkout.
- Home
- Shed Roof Framing
- How to build a gable shed roof
Your Guide to Building a Gable Shed Roof
A gable shed roof is the easiest to build, and depending on the pitch of the roof, will provide you with some storage space in the attic area. This style of shed roof is one of the most common and can be utilized for building playhouses, garden sheds, utility sheds and more.
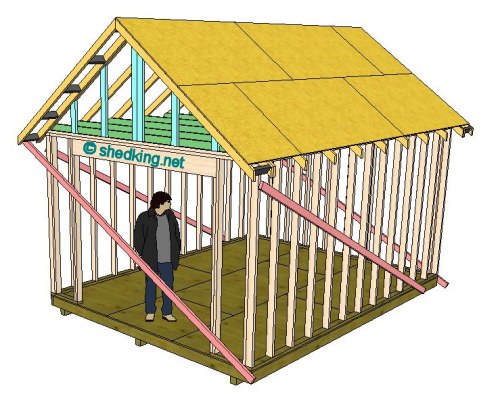 Gable Style Shed Roof
The following information is provided to you as a guideline and is intended to be used in conjunction with the user checking with local building authorities to make sure all building practices conform to local building codes. Use this information at your own risk.
Remember the pythagorean formula you learned in school?
A² + B² = C²
Use the pythagorean formula for figuring your gable shed roof
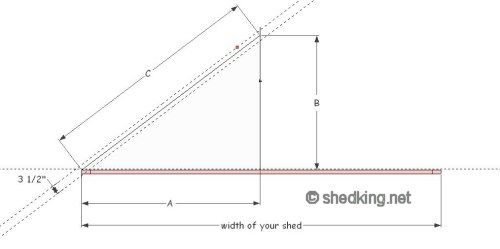
A is half the distance of your shed width.
B is the distance from the top of your walls top plate to the inside of your roof peak.
C is the distance between the outside ends of A and B.
Keeping this formula in mind, we can build a shed truss or figure out the measurements of a rafter with a ridge board running down the roof peak.
Here's how to do this.
An Example:
Say your shed is 12' wide.
Given this measurement, then A is 6', or half the width of your shed. This is the measurement of your floor width. This brings up an important bit of info. If your shed is going to be say 12'wide x 16' long. Then the exact measurements of your floor will also be 12'x16'. With this in mind, once you build your floor to these measurements and have erected your walls, the distance from the outside of one wall to the opposite wall will be 12'. And the 2 remaining walls will be 16' from outside to outside.
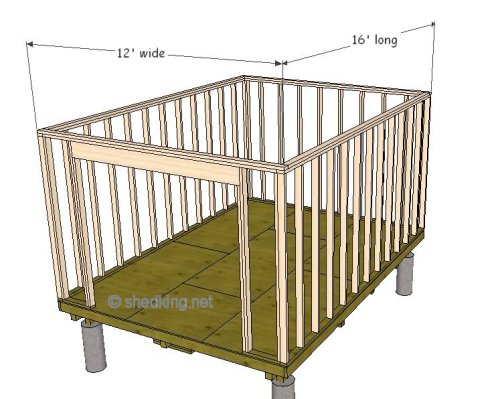 Example using a shed 12' wide
The roof pitch on a gable roof is important!
Now, one other important factor to remember is that you never, never want the pitch of your roof to be less then 15°, unless you plan on going with a metal roof. Shingles at any slope less than this will leak, and leak bad. Water, in the form of rain or melting ice and snow will very easily work its way up under the shingles and down through your roof sheeting, causing much damage. Given the fact that A=6' and lets say you want 5' from the top of your shed walls to your roof peak (inside). This gives us 5' for the loft distance, or B
So, A=6' and B=5', so A (squared) + B (squared) = c (squared) 36 + 25 = C (squared)
C (squared) = 61
C = 7.81'
.81 x 12 = 9.72 or 9 3/4
So, c= 7' 9 3/4
So now we know all the values of A,B, and C.
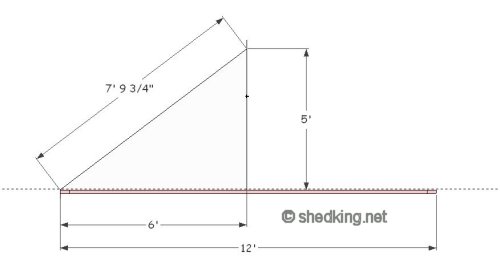
It's not that difficult!
What do we do now?
Based on the fact that c= almost 8', we are going to at least need an 8'- 2x4 to build this gable shed roof rafter. Better go with a 10' piece because we want to have a rafter tail that will give us a side overhang for our shed.
Take this 2x4 and snap a chalk line down the middle of it on the flat side.

Now on your flat surface, snap or draw a line 12' long. At exactly the middle of this line, (a = 6' )draw a line up perpendicular the distance equal to 'b', or 5'. Now take your chalk line and snap a line from the top of your 'b' line, down to the outside end of your 'a' line. This snapped line will represent 'c'. Measure it. It should equal the number you determined using the equation for the Pythagorean formula.
Now measure 1.5 inches on either side of this line. Do this at the top and bottom and snap lines. This will represent your 2x4 rafter. The 12' line you snapped earlier will represent the top plate of your shed, and the outside corners of this line will be the outside edges of your side walls top plate.
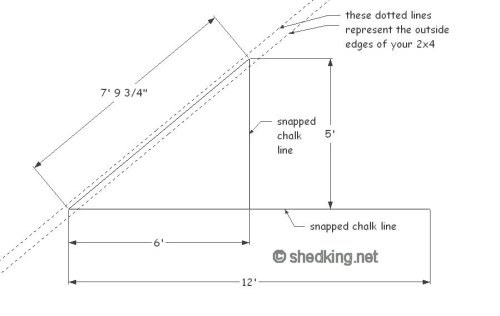
Now we can measure exactly what the measurements will be for your gable shed roof rafter or truss half that will span your shed exactly 12' and give you an inside height of 5' from your top plate to the inside of the top of the truss pieces.
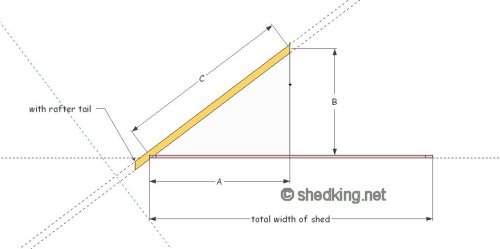
The following picture shows all the pertinent measurements you will need to cut your first rafter or truss half. You should be able to transfer about 9 critical measurements to your 2x4 for cutting. Once you have the measurements done, you can cut your board, duplicate on a second board, and you will then have a complete truss or 2 rafter halves to nail to a ridge board.
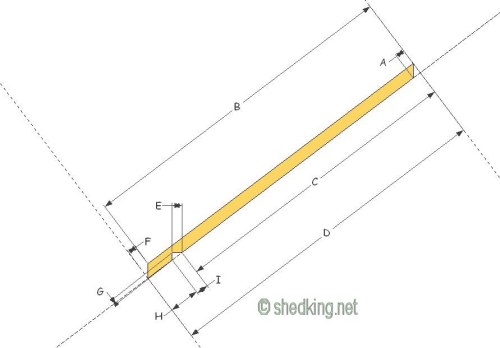 Transferring the measurements to your 2x4 rafter or truss
Building your gable roof truss
Make your truss by putting the 2 pieces together on the line you snapped for your top plate. The truss should fit exactly so that the 'birds mouth' sits right exactly where the top plate is.
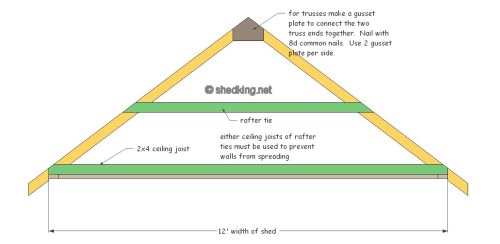
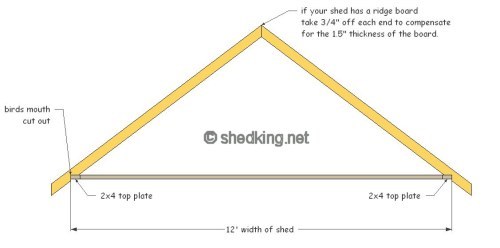 gable roof with completed truss Add gusset plates and rafter ties to the gable truss
 Gable shed roof trusses in place with ceiling joists installed
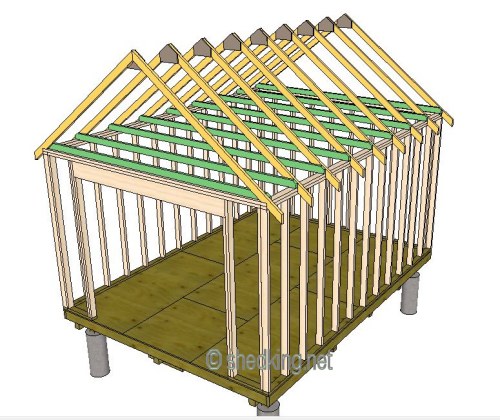
Trusses are attached to the top plate by using 3-16d common nails toe-nailed from the truss end into the top plate, 2 on one side, and one on the other. Your local building codes may also require the use of hurricane ties for each truss member where it rests on the top plate.
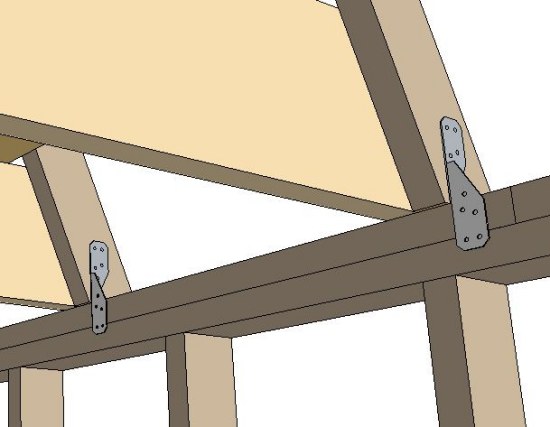 Check your local codes - you may need to
 use hurricane ties to anchor
your shed trusses down
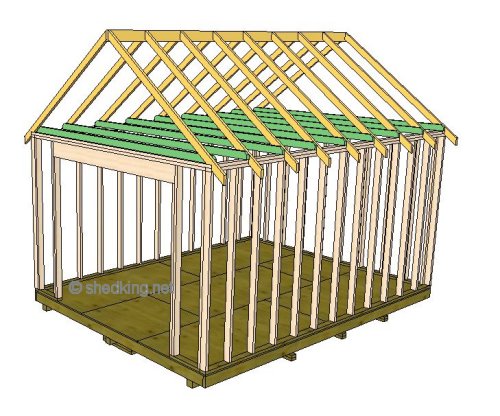 Building your gable shed roof with a ridge board
The ridge board on a gable style shed roof
The shed roof pictured above shows rafters attached to a ridge board. This can be accomplished with the trusses described previously by cutting off 3/4" off the top end of the truss. This allows you room for the 1.5" wide ridge board. Ends of the rafters are toe-nailed to the ridge board with 3-16d nails.
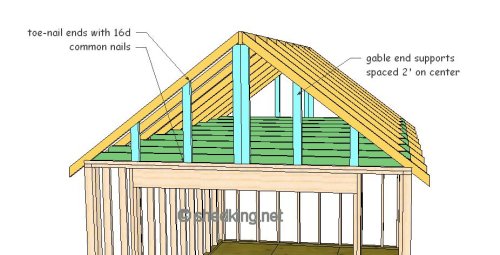 Gable end supports
Monthly DIY
Shed-in-sight
Newsletter
Subscribing will get you discounts on shed plans, monthly updates, new shed design ideas, tips, exclusive discounts on shed building resources and tools. Learn more here.
Recent Articles
-
Easy Diy Shed Plans and Ideas For You To Build Sheds
Dec 31, 24 09:49 PM
All types of shed plans for gable, barn, saltbox, and lean to style sheds small and large that can be used for storage, shed to house, workshops and more. -
Shed Plans For Building a 16x20 Barn Shed
Dec 31, 24 09:43 PM
Plans for building a 16x20 barn shed -
12 x 16 garden shed plans
Dec 15, 24 05:40 AM
I've never built a shed or anything like this before, but I have a background in lumber and building supplies. The build went well, but there are 2 things
My You Tube Videos


