Want to Save 30% off Any Shed Plan Purchase!
Signup For My 'Shed n Sight' Newsletter
and Get Your 30% off Promo Code To Use At Checkout.
- Home
- How to build shed doors
- What is a door header
How To Build Headers
For Your Shed
Here's a simple guide on how to make headers for your shed doors and windows.
Why do you need a door or window header?
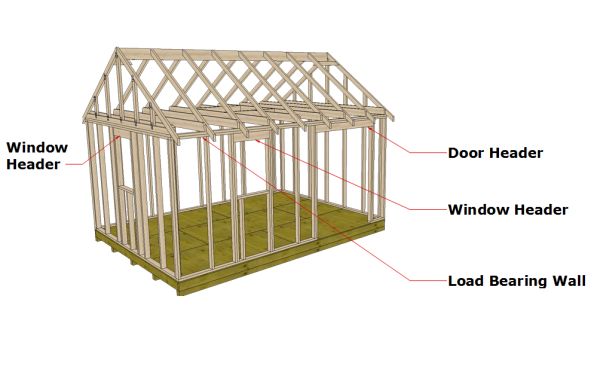
When framing your shed walls, its very important to have headers over door and window openings. These headers carry the roof load from above and prevent any sagging of the wall framing, specifically around the top plates.
If headers weren't used on load bearing walls for openings, this could cause a potentially dangerous hazaard. Not only would the structure be unsafe, doors and windows over a period of time would not function properly.
How big should a header be?
The width or span of the opening will determine the size of the header needed. The chart below shows common header sizes for different openings.
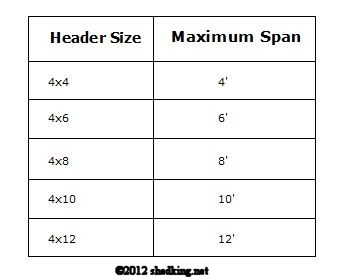 Header Span Table
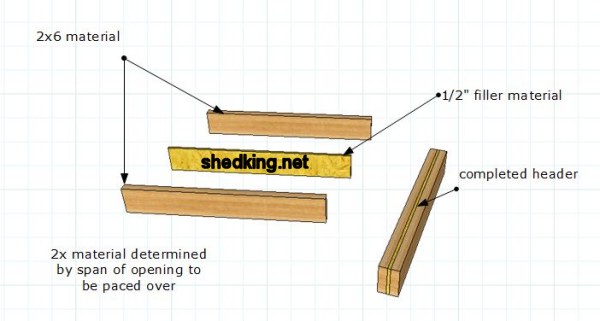
In the top picture above, the door opening is 5'. So, the header is constructed of two 2x6's with a 1/2" osb or plywood spacer. These three header components when assembled and nailed together, will be exactly 3.5" wide. This width is the same width as a typical 2x4 framed wall.
After a header is properly installed in a 2x4 framed wall, the back and front will be flush with the wall framing on both sides. This will allow for exterior sheathing such as siding or osb or plywood panels to be installed with no obstructions in the way. Also if some sort of interior finish work is to be done such as drywall, nothing would be in the way as far as the header goes.
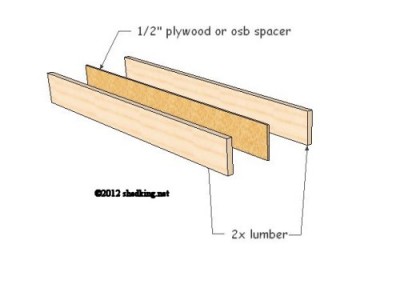 Typical Header Construction
Headers are needed in load bearing walls
A typical shed will almost always have at least 2 load bearing walls. These will be the walls directly under the truss or rafter ends. Non-load bearing walls may not need headers, but I always put them over any openings just to be on the safe side of caution. You may change or add something down the road to your shed necessitating the need for headers. So it's always a good idea to use headers over all openings.
Once you have determined the size lumber you need for your header and have all the three pieces cut, these can be placed together and nailed using 16d nails. A row across the top and bottom will be needed, and the nails should be spaced 16" on center.
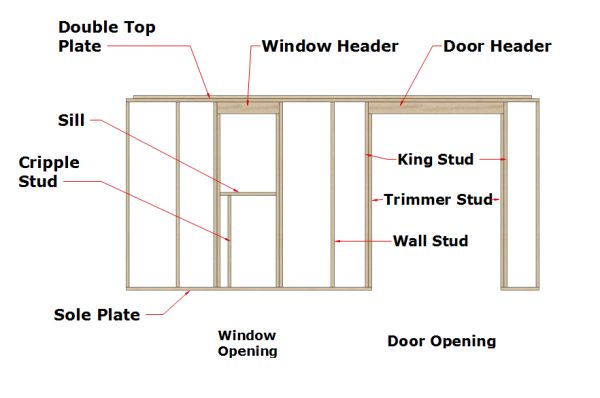
A header has to be supported from beneath on each end by whats known as a trimmer stud, which in turn each have a king stud along the outsides of the trimmers. These are nailed together for strength.
Without the proper framing for your header, you may as well not even have the header there as there would not be anything to support the load over the header. It would sag and eventually collapse!
 Nailing a Header Together
With the header in place, nails should be used going through the outside of the king studs into the ends of the header on each 2'x end.
Monthly DIY
Shed-in-sight
Newsletter
Subscribing will get you discounts on shed plans, monthly updates, new shed design ideas, tips, exclusive discounts on shed building resources and tools. Learn more here.
Recent Articles
-
12 x 16 garden shed plans
Dec 15, 24 05:40 AM
I've never built a shed or anything like this before, but I have a background in lumber and building supplies. The build went well, but there are 2 things -
How to Build a Shed, Shed Designs, Shed Plans
Dec 02, 24 05:49 AM
It's fun to learn how to build a shed and easy with free guides, design software, cheap plans, tips and support all from a shed building pro. -
Backyard Office Plans
Dec 01, 24 03:36 PM
Discover a variety of backyard office plans and shed ideas that will help you transform outdoor spaces into a productive functional office shed.
My You Tube Videos
